React & Redux基础知识补遗
Tue, Mar 5, 2019
0x0 React基础知识部分
React的定位:视图层框架
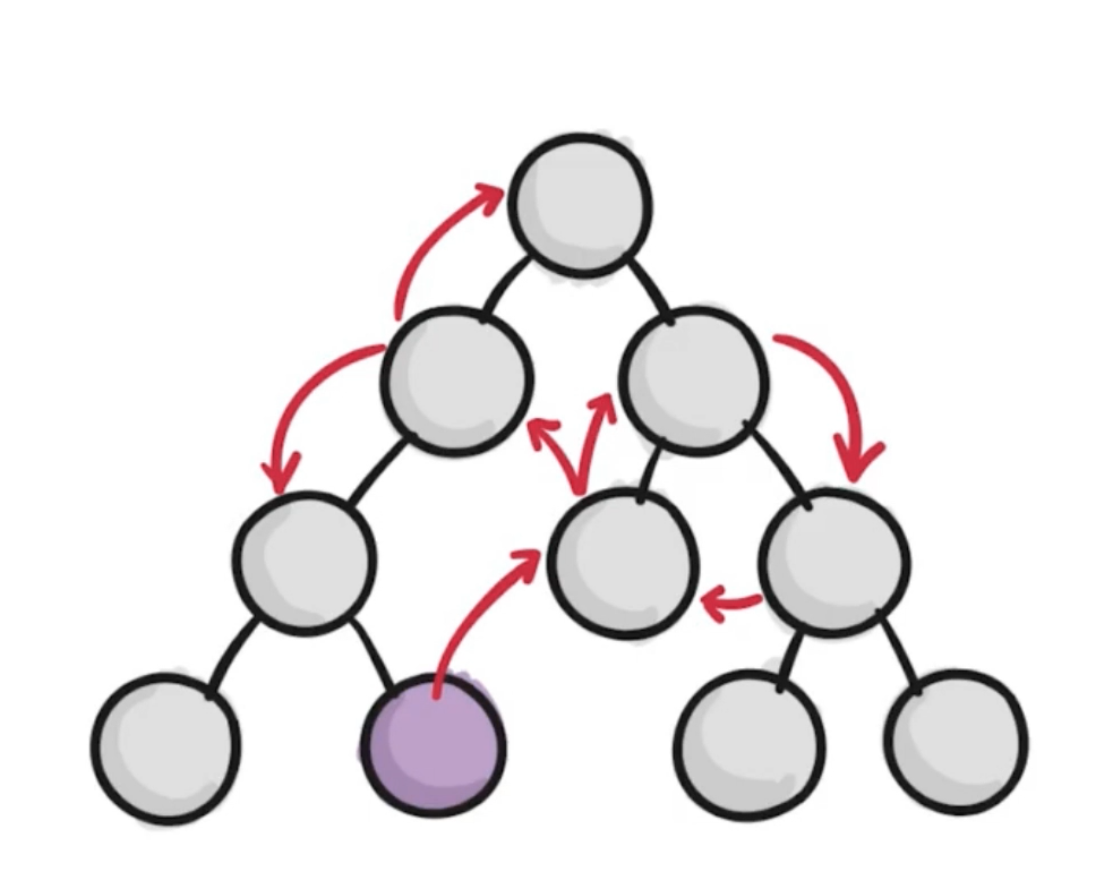
当紫色的组件,希望和右边灰色的组件通信的时候,如果只有React框架:
- 需要把数据传到根节点,然后再分发(单向数据流)
- 会造成大量冗余代码
React把自己定位为「视图层框架」:
- 只负责组件的渲染
- 数据的传递、通信之类的东东,通过其他「数据层框架」来实现
State、Props、render之间的关系
- 当组件的state或props发生改变的时候,render函数就会重新执行
- 父组件调render,子组件也会执行render
- 优化:子组件实现shouldComponentUpdate(nextProps, nextState)方法,通过return true/false控制是否render
生命周期方法
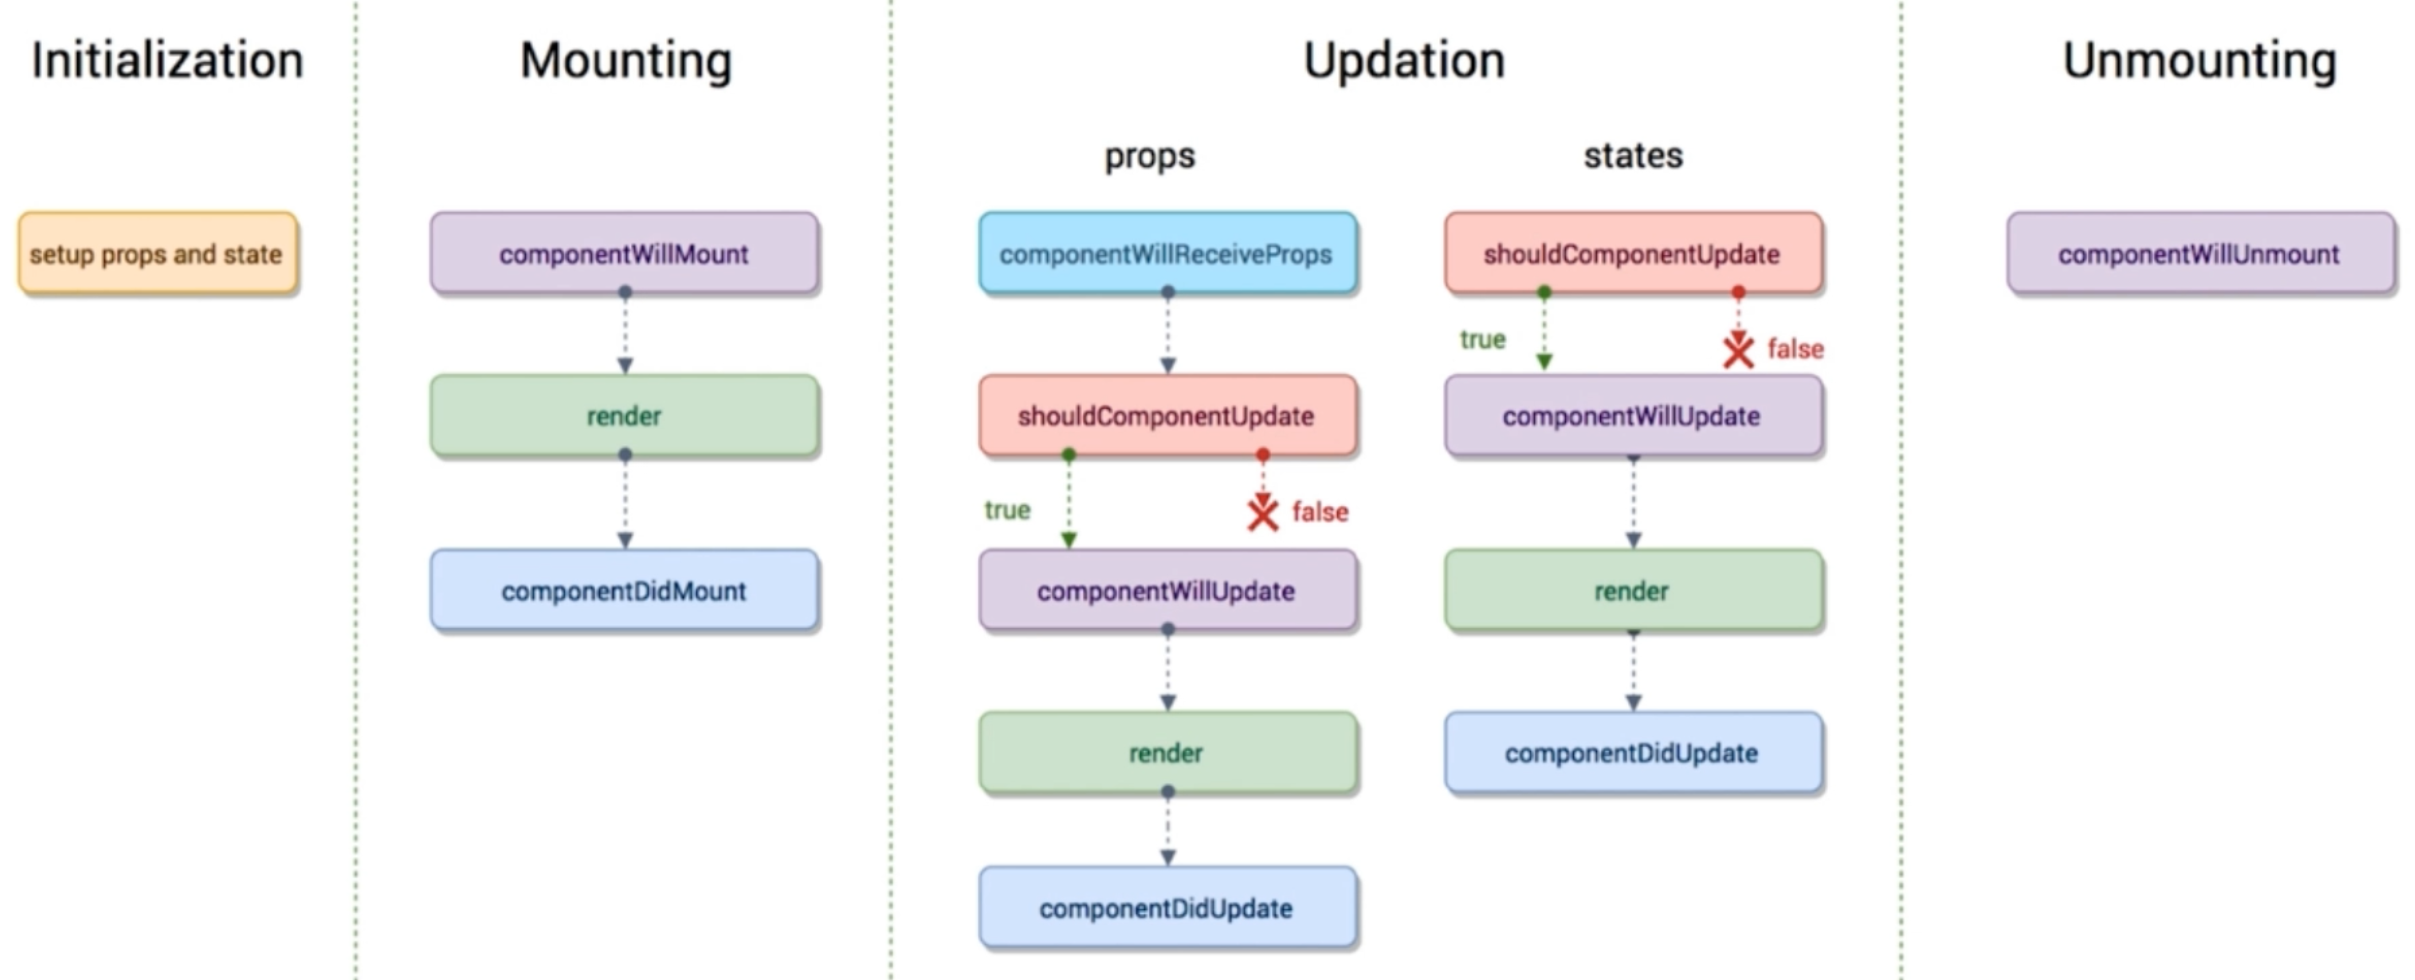
componentWillReceiveProps执行时机
- 组件初次挂载,不执行
- 组件挂载后接收新Props,执行
componentDidMount执行网络请求
虚拟DOM
虚拟DOM是RN的基础:
虚拟DOM机制导致最终的渲染步骤非常少
- 把虚拟DOM这个JS对象渲染到DOM中,就是React
- 渲染到Native端生成一个Native组件,就是RN
setState异步执行
setState是异步的,连续调用3次state,实际上会只进行一次DOM比对
this.setState(() => ({
  stateKey1: stateValue1,
  stateKey2: stateValue2,
}), () => {
  // setState异步执行完成后的回调函数
}) |
Diff算法
differ算法的本质:
- 同层比对:先比较根节点,如果根节点不一致,下面的节点就不比较了,全部重新渲染
- 减少了differ算法的执行次数
虚拟dom会给每个dom一个key,diff的时候相同key的进行比对,提升比对性能
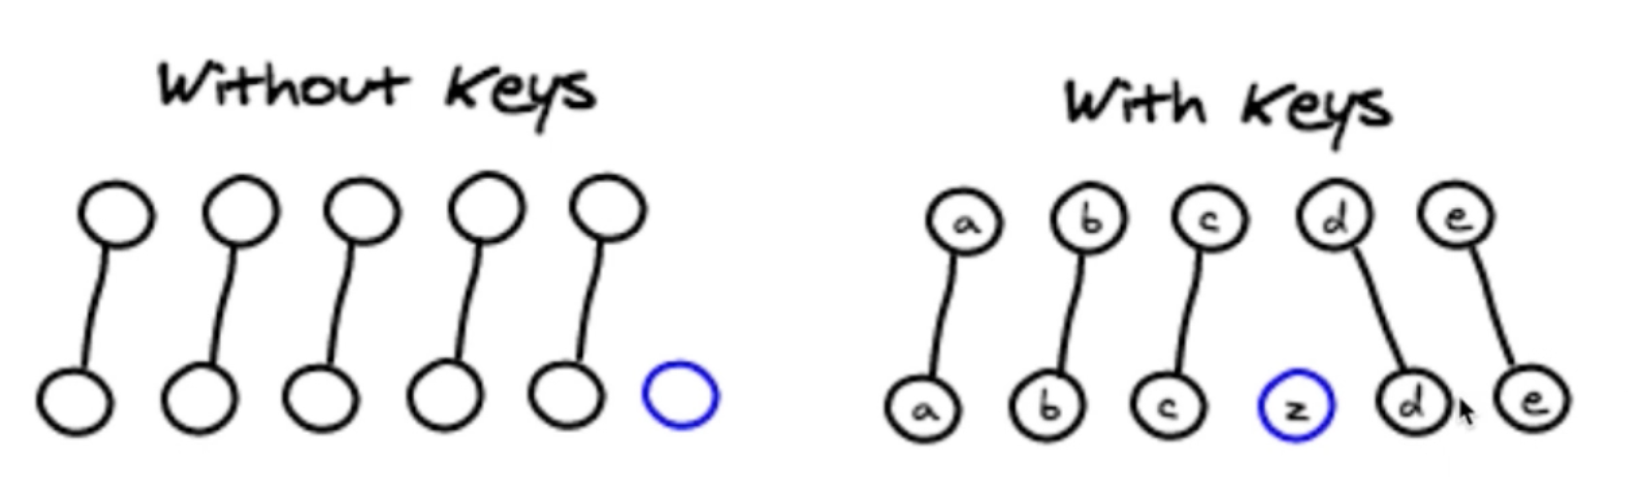
数组型元素,不能用index作为key值的原因:
- 同一个元素,因为数组中插入了新元素,index不同导致每次key不相同,会造成无法准确比对的问题
Ref的使用
// 设置
<input
ref={(input) => {this.input = input}}
/>
|
列表拷贝
const newList = […oldList] |
动画相关
方法一:通过切换组件的className控制动画
.show {
opacity: 1;
transition: all 1s ease-in;
}
|
方法二:css3关键帧动画
@key-frames hide-item {
0% {
opacity: 1;
color: red;
}
50% {
opacity: 0.5;
color: green;
}
100% {
opacity: 0;
color: blue;
}
}
|
说明:百分比,是以「时间」为维度的
方法三:react-transition-group实现动画
- 提供了hook函数
- 通过js操纵动画
- 一般动画使用CSSTransion就好,进阶需求使用更底层的Transion组件
0x1 Redux基础知识部分
1 Redux的简单使用
Redux思路
将数据放在公共的数据存储区Store中,需要传值的时候,修改Store中的内容
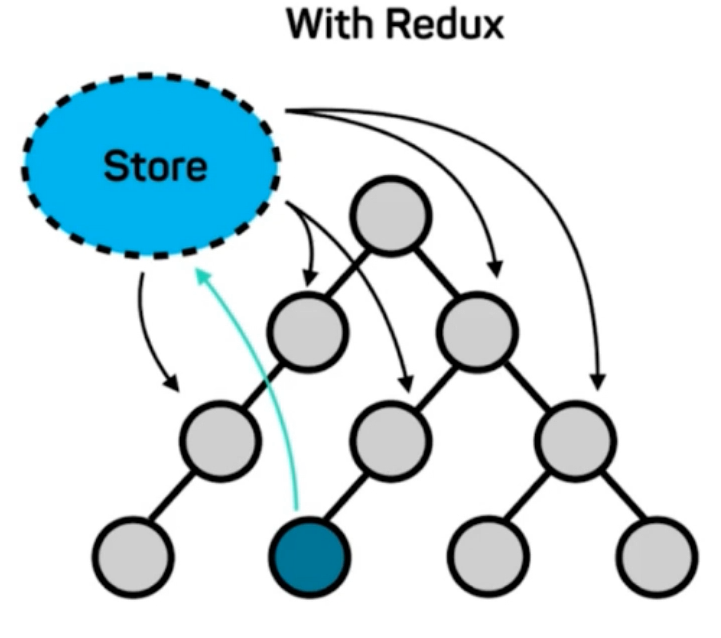
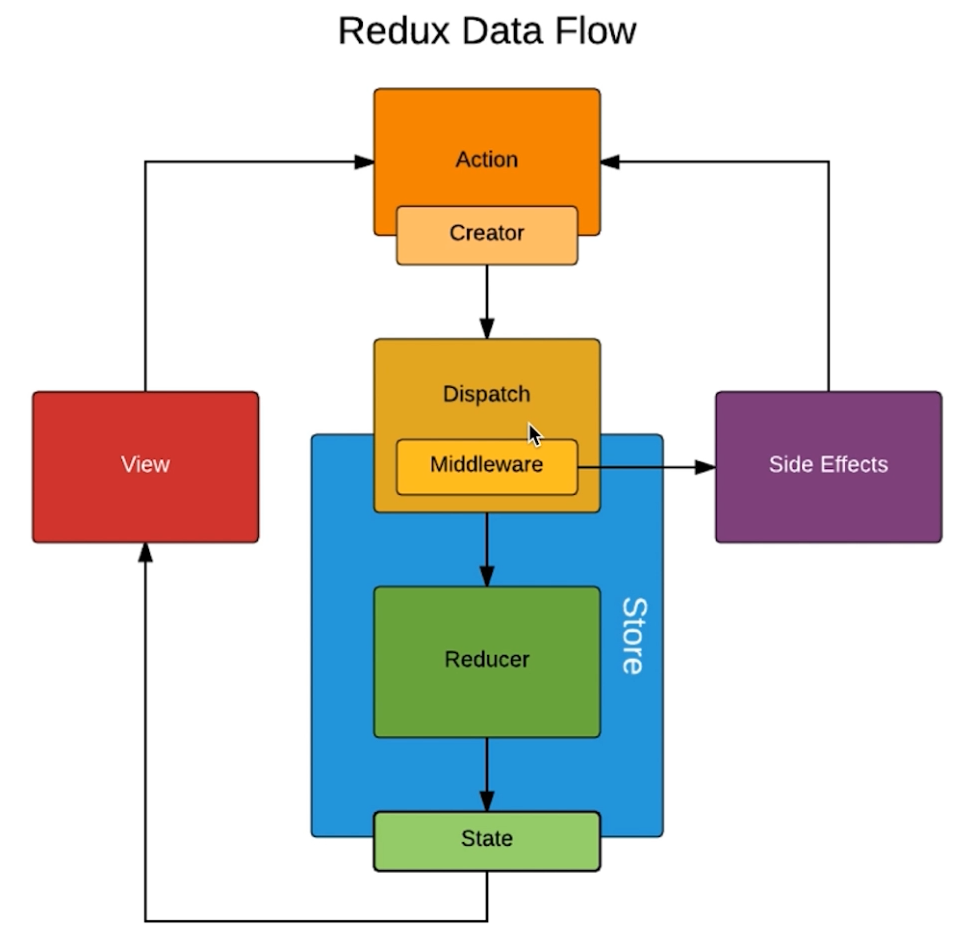
Redux数据流

Redux使用的一般步骤
创建store
/src/store/index.js
import { createStore } from ‘redux’
import reducer from ‘./reducer’
|
说明:
chrome的redux中间件插件配置,文档:https://github.com/zalmoxisus/redux-devtools-extension
/src/store/reducer.js
const defaultState = {
inputValue: ‘ttt’,
list: [1, 2],
};
|
store的基本使用
import store from ‘./store’ |
action的创建和使用
App.js
handleEvent(e) {
    const action = {
        type: ‘event_name’,
        value: e.target.value,
    };
    store.dispatch(action)
} |
根据action调整reducer
const defaultState = {
inputValue: ‘ttt’,
list: [1, 2],
};
|
注意:
- reducer的写法:只能创建一个新的state,不能改变state的属性值
组件订阅store改变事件
App.js
store.subscribe(this.handleStoreChange); |
抽取文件管理所有action
actionTypes.js
export const EVENT_NAME = ‘event_name’; |
抽取文件管理action的创建
actionCreators.js
getEventAction |
Redux使用三原则
- store是唯一的
- 整个app只能有一个store,表面上时reducer改变了store的内容,其实不是,reducer只是返回了一个新的state给store,最终stroe改变自己的内容
- 只有store能改变自己的内容
- Reducer必须是纯函数
- 给定输入一定有指定的输出
Redux相关API
createStore
store.dispatch
store.getState
store.subscribe
UI组件、容器组件、无状态组件
UI组件:只负责渲染UI
容器组件:负责整个组件的功能实现 & 数据传递的
无状态组件:一个组件只有render函数的时候,可以使用纯函数实现,叫无状态组件,没有生命周期方法,性能更优秀
const component = (props) => {
    return (
        <div>xxx</div>
    )
} |
2 Redux中间件
中间件:插入到xx和xx之间的东东
Redux中间件:本质是对dispatch方法的封装
- redux-thunk:之前的dispatch只能接收对象的传入,使用中间件升级dispatch后,可以接受一个函数了
- logger中间件:每次发送action的时候,都会传给dispatch。为dispatch做下升级,每次接收到action就打印出来,就是一个Logger中间件了
- Redux-saga:允许把异步逻辑拆到一个单独的文件中管理
Redux-thunk
异步请求放在组件中做,组件会很臃肿 - Redux-thunk可以让这些逻辑放到action中
未使用Redux-thunk时的网络请求,一般写在App.js文件中
componentDidMount() {
    axios.get(‘xxx’).then((res) => {
        const action = xxxAction(res.data)
        store.dispatch(action)
    })
} |
redux-thunk配置
相关文档:https://github.com/zalmoxisus/redux-devtools-extension#12-advanced-store-setup
import { createStore, applyMiddleware, compose } from ‘redux’
import reducer from ‘./reducer’
import thunk from ‘redux-thunk’
|
之后App.js
componentDidMount() {
    const action = xxxAction()
    store.dispatch(action)
} |
说明:
- dispatch的时候,action的函数会自动执行
之后的Action
export const xxxAction = () => {
    return (dispatch) => {
        axios.get(‘xxx’).then((res) => {
            const action = xxxAction(res.data)
            dispatch(action)
        })
    }
} |
Redux-saga
这个东东和thunk二选一就好,作用是,可以把异步逻辑抽离到一个单独的文件中管理
之前的App.js
componentDidMount() {
axios.get(‘xxx’).then((res) => {
const action = xxxAction(res.data)
store.dispatch(action)
|
saga.js
import { takeEvery, put } from ‘redux-saga/effects’
import { EVENT_NAME } from ‘./actionTypes’
import { getEventAction } from ‘./actionCreators’
import axios from ‘axios’
|
说明:
- 这样写异步请求:yield关键字 - 异步请求执行完之后,再赋值给res
- 异步请求执行完之后,再执行put方法 - 以及处理网络请求失败
- yield关键字是generator函数相关的语法
- saga内置的put函数可以实现把action丢给store - generator中不要用promise做异步处理
- takeEvery可以捕获action & 调用自定义方法
配置/store/index.js
import { createStore, applyMiddleware, compose } from ‘redux’
import reducer from ‘./reducer’
import createSagaMiddleware from ‘redux-saga’
import mySagas from ‘./saga’
|
说明:
- saga文件,必须要求返回一个generator函数
- 使用了saga之后,action不仅reducer会收到,saga文件也会收到一份
3 React-Redux
入口文件:src/index.js
import React from ‘react’;
import ReactDOM from ‘react-dom’;
import XXComponent from ‘./XXComponent’;
import { Provider } from ‘react-redux’
import store from ‘./store’
|
说明:
- Provider组件 - react-redux提供的核心组件,Provider会把指定的store提供给里面所有的组件及子组件
组件:XXComponent.js
import React from ‘react’;
import { connect } from ‘react-redux’
|
说明:
- 通过connect方法,让组件和store做连接
- mapStateToProps是用来把store转为当前组件的props的
mapDispatchToProps,可以把其中定义的函数,绑定给组件的prop中。组件直接调用this.props.xxxxx - 这里可以接收到dispatcher
- 由于业务逻辑被抽离了,组件可以做一个「无状态组件」
- connect返回的内容,是一个容器组件。它把UI组件和业务逻辑结合