Golang与密码学
Thu, Sep 6, 2018
0x0 概述
这篇文档主要聊聊三种加密方式与Golang实现
- 哈希加密
- 对称加密
- 非对称加密
0x1 哈希加密
哈希算法
我们知道,查找中,有「哈希查找」,是一种比「顺序查找」更快的查找方法。
「哈希查找」的关键点,就是实现一种「哈希算法」,使得每个任意key,经过哈希算法计算后,可以获得一个定长的散列值。
- 相同key经过相同哈希算法散列之后,获得相同的散列值
- 不同key经过相同哈西算法散列之后,获得不同的散列值
特点:
- 可以把任意长度的「明文」,散列成固定长度的「指纹」
- 正向计算简单快速,逆向推算困难,基本不可能逆推出明文
- 明文有一点点变化,密文就会改变
- 优秀的散列算法需要尽量避免两个不同的明文,加密出来是相同的指纹
发展:
取模操作 → 异或运算→ 位移操作
密码学里面,一般都通过「位移操作」「取模操作」「异或操作」来实现加密 - 无论对称加密非对称加密、哈希散列加密
成熟Hash算法
- MD5
- SHA
- RIPEMD
Golang相关hash代码片段
MD5
MD5加密结果为16字节串
data := []byte("test string")
s := fmt.Sprintf("%x", md5.Sum(data)) |
m := md5.New() m.Write(content) s := hex.EncodeToString(m.Sum(nil)) |
SHA256
sha256加密方式,通常用在公链中,散列结果为32字节
s := fmt.Sprintf("%x", sha256.Sum256(content)) |
m := sha256.New() m.Write(content) fmt.Println(hex.EncodeToString(m.Sum(nil))) |
文件内容加密
f,_ := os.Open("filename")
h := sha256.New()
io.Copy(h,f)
s := h.Sum(nil)
fmt.Println(hex.EncodeToString(s)) |
RIPEMD160
ripemd160目前只在数字货币中用到了 - 以太坊
三方包:golang.org/x/crypto/ripemd160
可以使用gopm安装
gopm get -v -u golang.org/x/crypto/ripemd160
hasher := ripemd160.New()
hasher.Write([]byte("test string"))
fmt.Println(hex.EncodeToString(hasher.Sum(nil))) |
0x2 对称加密
对称加密,加密完之后,是可以通过密钥解密的 - 和hash加密不一样
常见对称加密算法:
- DES
- AES
补码、去码 & 分组加密
补码:给15个字符做「分组加密」,无法平均分成两组,所以需要补一个码凑成16个字符,这种操作叫做「补码」
分组之后,给两个组分别加密,之后把两部分整合起来,获得最终密文
去码:解密的时候把补码去掉
三种补码方式
- NoPadding:「要补几个码」、「补入的码的内容是什么」API或算法本身不进行定义,而是由加密双方进行约定后,进行填补
- PKCS5Padding:「补足8个字符」、「补入的码内容为:8 - n」
- 如一个分组只有3个字符,差5个字符到8位,所以补5个「数字5」到串中
- 去码的时候,通过最后一位的数字值,就知道补了几个码,拿到需要「去几个码」,然后做切片就好
- PKCS7Padding:可自定义分组长度
补码代码片段
func PKCS5Padding(cipherTxt []byte, blockSize int) []byte {
    padding := blockSize - len(cipherTxt)%blockSize
    padTxt := bytes.Repeat([]byte{byte(padding)}, padding)
    byteTxt := append(cipherTxt, padTxt...)
    return byteTxt
} |
去码代码片段
func PKCS5UnPadding(cipherTxt []byte) []byte {
    l := len(cipherTxt)
    txt := int(cipherTxt[l-1])
    return cipherTxt[:l-txt]
} |
DES加密
DES加密中,密钥的长度为:
- DES:8
- 3DES:24
代码片段
加密
func DESEncrypt(origData []byte, key []byte) []byte {
    //校验秘钥
    block, _ := des.NewCipher(key)
    //补码
    origData = PKCS5Padding(origData, block.BlockSize())
    //设置分组加密模式CBC
    blockMode := cipher.NewCBCEncrypter(block, key)
    //加密明文
    crypted := make([]byte, len(origData))
    blockMode.CryptBlocks(crypted, origData)
    return crypted
} |
解密
func DESDecrypt(cryted []byte, key []byte) []byte {
    //校验key的有效性
    block, _ := des.NewCipher(key)
    //使用CBC模式解密
    blockMode := cipher.NewCBCDecrypter(block, key)
    //实现解密
    origData := make([]byte, len(cryted))
    blockMode.CryptBlocks(origData, cryted)
    //去码
    origData = PKCS5UnPadding(origData)
    return origData
} |
AES加密
Advanced Encryption Standard
AES是DES的替代品,算法更复杂且更安全。明文分组为128位(16字节),密钥长度可为(16、24、32字节)
AES加解密原理
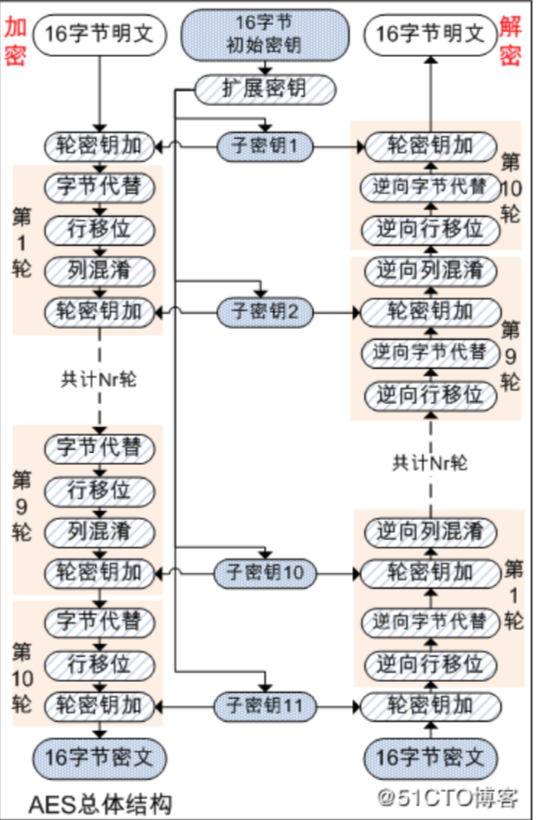
- 左边是加密的过程,右边是解密的过程
- 前9轮用相同的步骤,最后一轮只有三个步骤(少一个步骤)
- AES和DES都经过了「多轮加密」,AES的轮数根据密钥的长度而定
- 16字节:10轮
- 24字节:12轮
- 32字节:14轮
- 密钥角度 - 会做扩展密钥,如图生成了11个子密钥。每一轮加密使用不同的密钥
AES原理动画演示(from: Howard Straubing)
<embed type="application/x-shockwave-flash" width="680" height="400" src="https://coolshell.cn/wp-content/uploads/2010/10/rijndael_ingles2004.swf" quality="high" align="middle" /> |
分组加密
两种密码算法:
- 分组密码(block cipher):每次只处理特定长度的一块数据。分组的比特数就是「分组长度」
- 流密码(stream cipher):对数据流进行连续处理的一类密码算法
- 缺点:需要记录加密到哪了...不便于并行处理
ECB模式
Electronic Code Book mode
将「明文分组」加密后的结果直接作为「密文分组」。最后一组的长度小于分组长度时,做「补码」。
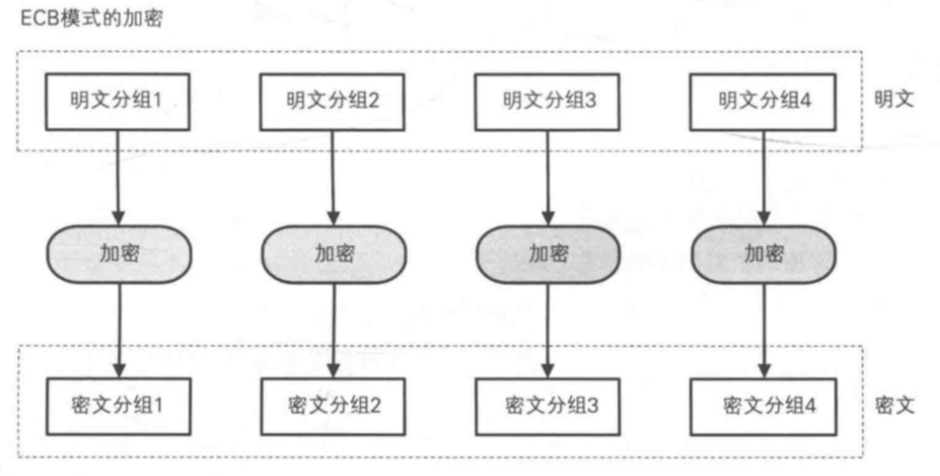
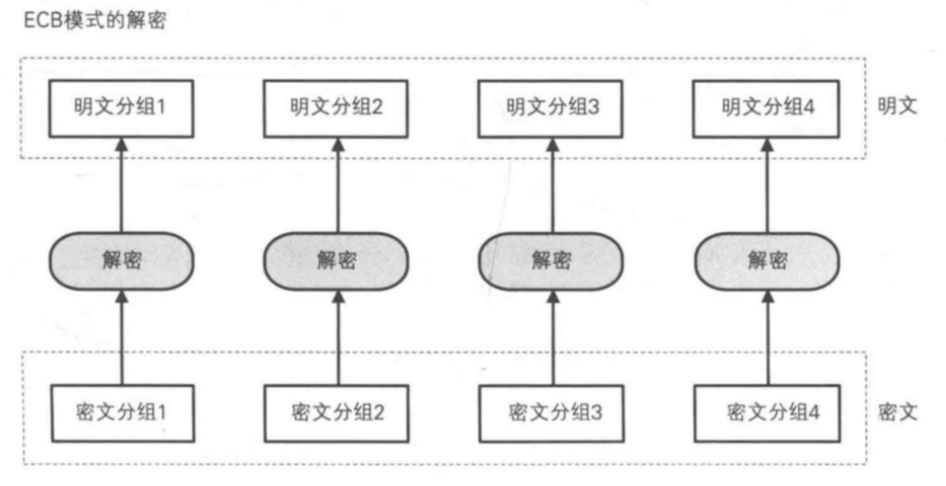
特点:明文分组和密文分组一一对应,观察密文分组能知道明文分组代表什么 - 以前比较好做外挂的网游封包常采用这种加密方式...(参考:手游封包辅助教程)
攻击思路
交换分组顺序攻击法 - 交换密文分组的顺序,解密后明文的顺序就自然发生了改变
举例:分组一、二、三分别代表了付款人、收款人、转账金额,攻击者交换分组一和分组二的顺序...不是操纵算法,而是操纵密文分组的顺序
CBC模式
Cipher Block Chaining
密文分组链接模式
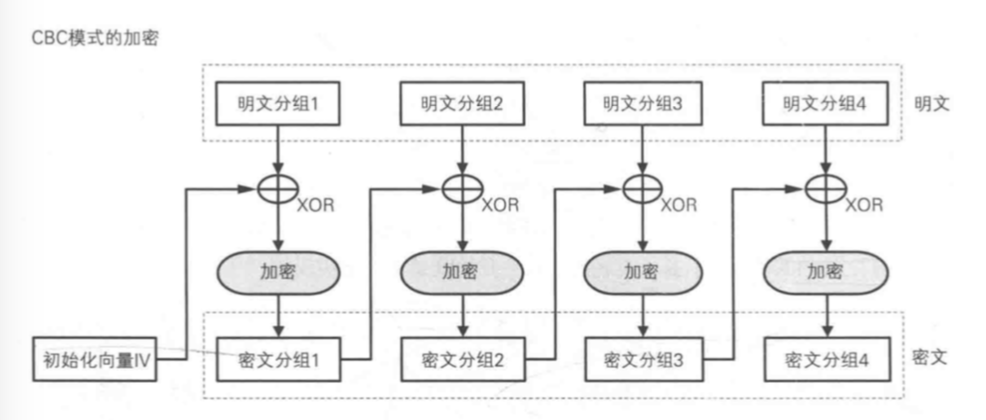
特点:加密的内容,是上一组的「密文分组」和下一组的「明文分组」的异或
- 希望通过这种方式,保证分组之间的顺序不可被篡改
- 一旦交换密文分组的顺序,就不能解出正确的明文
逆运算:异或的逆运算还是异或 - 按位与和按位或没有逆运算
补充:由于加密第一个明文分组的时候,木有和它异或的密文分组,所以需要一个随机数和它做异或。这个随机数叫做「初始化向量IV」
解密:本组密文和上一组得出的明文(或初始化向量)做异或,可以得到本组明文(加密使用的是异或,异或的逆运算还是异或)
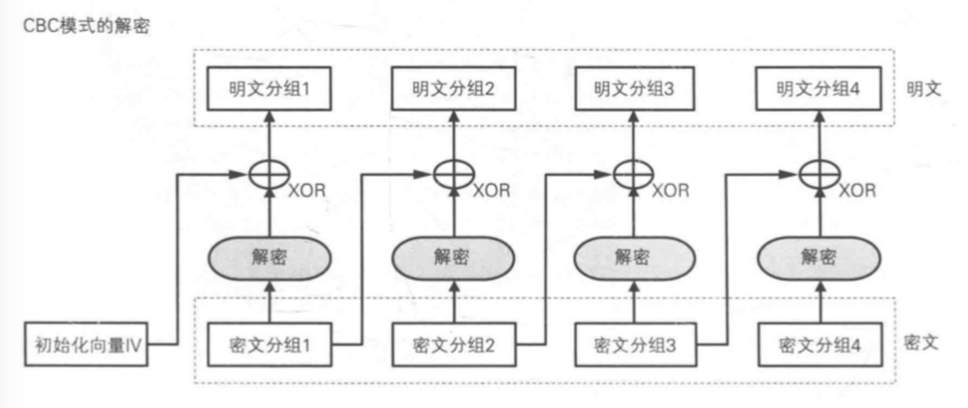
- IV和第一组密文,获得第一组明文
- 第一组明文和第二组密文,获得第二组明文
- ...
好处:
- 由于明文和密文不是一一对应的,明文一和明文二内容即使相同,密文也不同。攻击者不能通过观察明文和密文的对应关系,发现密文内容和明文内容的对应关系。
- 顺序相关:要加密分组2的明文,必须知道分组1才行。
- 密文分组丢失任何一个比特,后面的所有密文分组,都无法正确解密出来
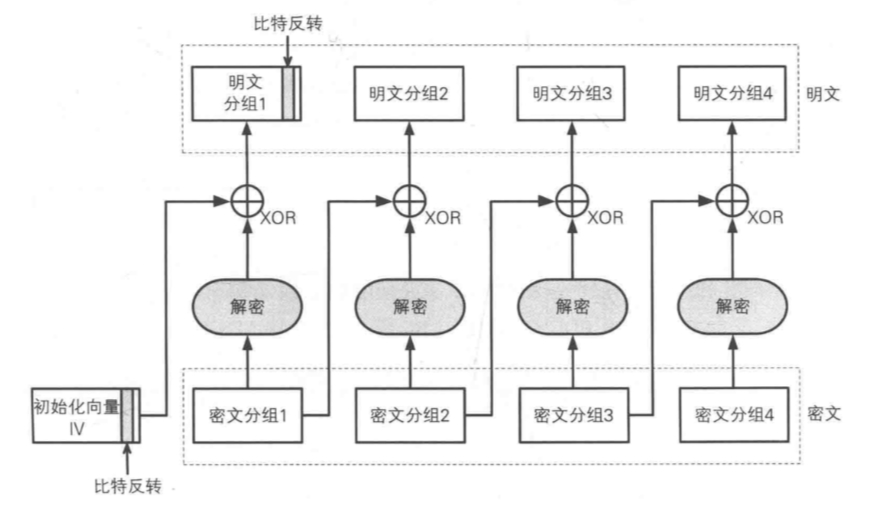
攻击思路
如果初始化向量被反转,通过被反转的初始化向量解密出来的明文的分组内容也会被反转
代码片段
//PKCS5Padding 要求分组长度只能为8
//PKCS7Padding 要求分组的长度可以[1-255]
func PKCS7Padding(org []byte, blockSize int) []byte {
    pad := blockSize - len(org)%blockSize
    padArr := bytes.Repeat([]byte{byte(pad)}, pad)
    return append(org, padArr...)
}


//去掉补码
func PKCS7Unpadding(org []byte) []byte {
    l := len(org)
    //获得数组中最后一个元素值
    pad := org[l-1]
    return org[:l-int(pad)]
}

//通过CBC分组模式,完成AES的密码过程
//AES 也是对称加密,AES 是DES 的替代品
//AES 秘钥长度,要么16,或者 24, 或者32
func AesCBCEncrypt(org []byte, key []byte) []byte {
    //校验秘钥
    block, _ := aes.NewCipher(key)
    //按照公钥的长度进行分组补码
    org = PKCS7Padding(org, block.BlockSize())
    //设置AES的加密模式
    blockMode := cipher.NewCBCEncrypter(block, key)

    //加密处理
    cryted := make([]byte, len(org))
    blockMode.CryptBlocks(cryted, org)
    return cryted
}

//AES解密
func AesCBCDecrypt(cipherTxt []byte, key []byte) []byte {
    //校验key
    block, _ := aes.NewCipher(key)
    //设置解密模式CDC
    blockMode := cipher.NewCBCDecrypter(block, key)

    //开始解密
    org := make([]byte, len(cipherTxt))
    blockMode.CryptBlocks(org, cipherTxt)

    //去除补码
    org = PKCS7Unpadding(org)
    return org
}

func main() {
    ciphertxt := AesCBCEncrypt([]byte("hello 123"), []byte("1234567890123456"))
    fmt.Println("解密后的结果", string(AesCBCDecrypt(ciphertxt, []byte("1234567890123456"))))
} |
CFB模式
Cipher FeedBack
对CBC的安全升级 - 保护初始化向量
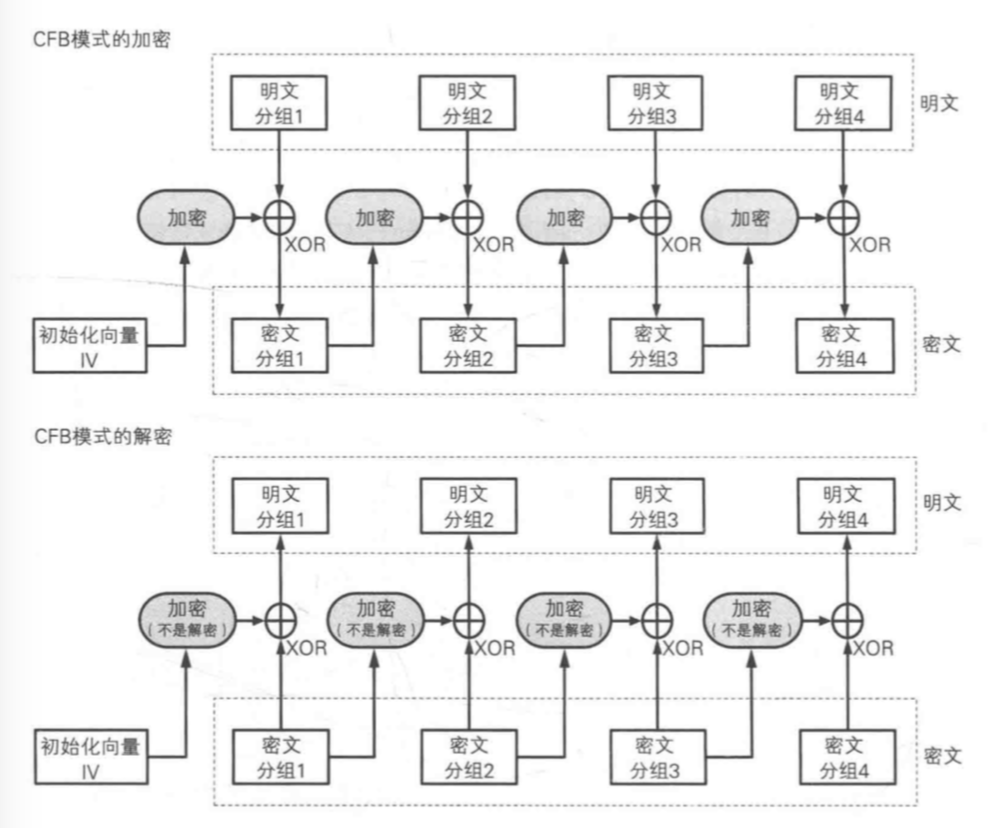
对初始化向量做加密处理,然后再和明文做异或,形成密文 - 防止初始化向量被反转
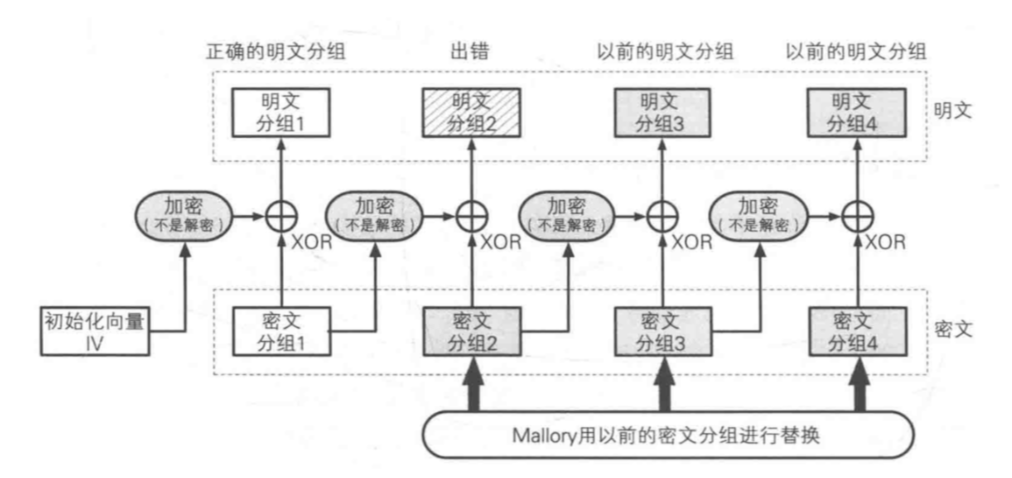
攻击思路
重放攻击(replay attack)
假设第一次发送了3个密文分组abc(对应明文ABC),攻击者截获后两个密文分组bc。
第二次又发送了3个密文分组xyz(对应明文XYZ),攻击者截获并修改密文分组为xbc。
第二次解密时:
- vi + x 获得第一组明文X
- x + b 无法获得有效明文?
- b + c 获得了第一组明文C
解密结果为X?C,攻击者成功把Z篡改成了C
代码片段
//通过CFB分组模式加密
func AesCFBEncrypt(plainTxt []byte, key []byte) []byte {
    //key是否合法
    block, _ := aes.NewCipher(key)
    cipherTxt := make([]byte, aes.BlockSize+len(plainTxt))
    iv := cipherTxt[:aes.BlockSize]


    //向iv切片数组初始化rand.Reader(随机内存流)
    io.ReadFull(rand.Reader, iv)

    //设置加密模式为CFB
    stream := cipher.NewCFBEncrypter(block, iv)

    //加密
    stream.XORKeyStream(cipherTxt[aes.BlockSize:], plainTxt)

    //cipherTxt 包含了key和明问的两部分加密的内容
    return cipherTxt

}

//通过AES算法,利用CFB分组模式解密
func AesCFBDecrypt(cipherTxt []byte, key []byte) []byte {
    block, _ := aes.NewCipher(key)

    //拆分iv和密文
    iv := cipherTxt[:aes.BlockSize]
    cipherTxt = cipherTxt[aes.BlockSize:]

    //设置解密模式
    stream := cipher.NewCFBDecrypter(block, iv)

    var des = make([]byte, len(cipherTxt))

    //解密
    stream.XORKeyStream(des, cipherTxt)

    return des
}

func main() {

    //对称加密DES,key为8
    //对称加密3DES,key为24
    //对称加密AES,可以16,24,32
    var cipher = AesCFBEncrypt([]byte("hello 123"), []byte("1234567890123456"))

    //通过编码,编译用户可以看到的密文
    fmt.Println(hex.EncodeToString(cipher))
    fmt.Println(base64.StdEncoding.EncodeToString(cipher))

    //解密
    var des = AesCFBDecrypt(cipher, []byte("1234567890123456"))
    fmt.Println(string(des))
} |
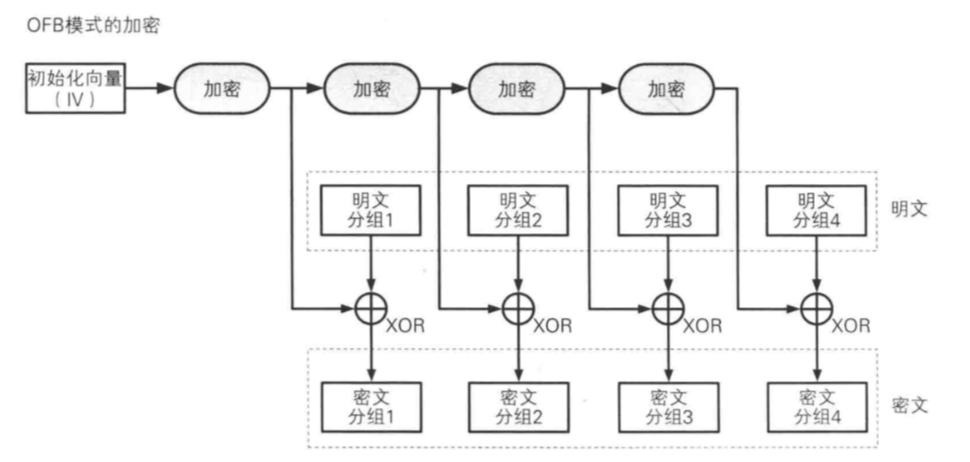
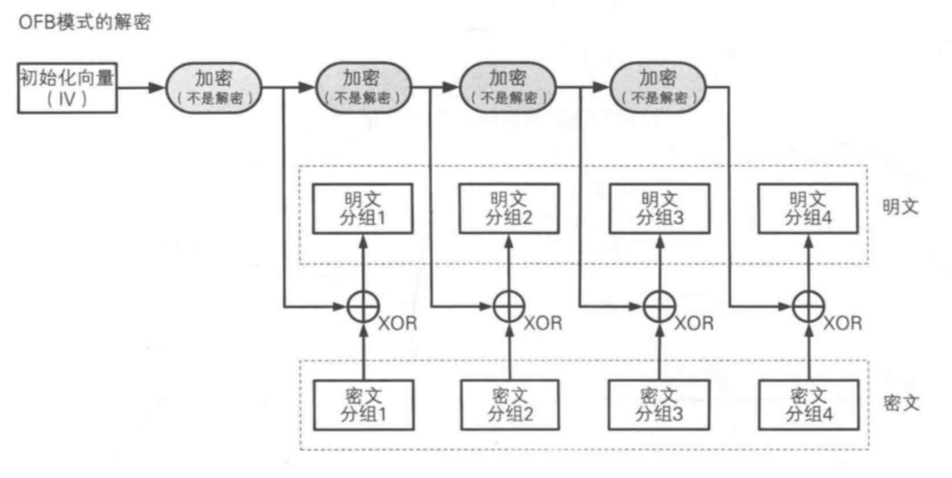
OFB模式
每组明文分组生成「密文分组」时,所用的密钥都不同 - 保证了CFB的攻击模式不能遂
- 分组2用的密钥由分组1用的密钥二次加密而成
特点:流密码
代码片段
// 加密
func AesEncrypt(plaintext, key []byte) ([]byte, error) {
    block, err := aes.NewCipher(key)
    if err != nil {
        return nil, err
    }

    ciphertext := make([]byte, aes.BlockSize+len(plaintext))
    iv := ciphertext[:aes.BlockSize]
    if _, err := io.ReadFull(rand.Reader, iv); err != nil {
        panic(err)
    }

    // NewOFB返回一个在输出反馈模式下使用分组密码b进行加密或解密的Stream。初始化矢量iv的长度必须等于b的块大小
    stream := cipher.NewOFB(block, iv)
    stream.XORKeyStream(ciphertext[aes.BlockSize:], plaintext)

    return ciphertext, nil
}

// 解密
func AesDecrypt(ciphertext, key []byte) ([]byte, error) {
    block, err := aes.NewCipher(key)
    if err != nil {
        return nil, err
    }
    // The IV needs to be unique, but not secure. Therefore it's common to
    // include it at the beginning of the ciphertext.

    iv := ciphertext[:aes.BlockSize]

    if len(ciphertext) < aes.BlockSize {
        panic("ciphertext too short")
    }
    plaintext2 := make([]byte, len(ciphertext))
    stream := cipher.NewOFB(block, iv)
    stream.XORKeyStream(plaintext2, ciphertext[aes.BlockSize:])

    return plaintext2, nil
} |
CTR模式
引入「计数器」的加密方式,通过对计数器加密,获得本明文分组所需要的密钥 - 也可以保证CFB的攻击模式不能遂
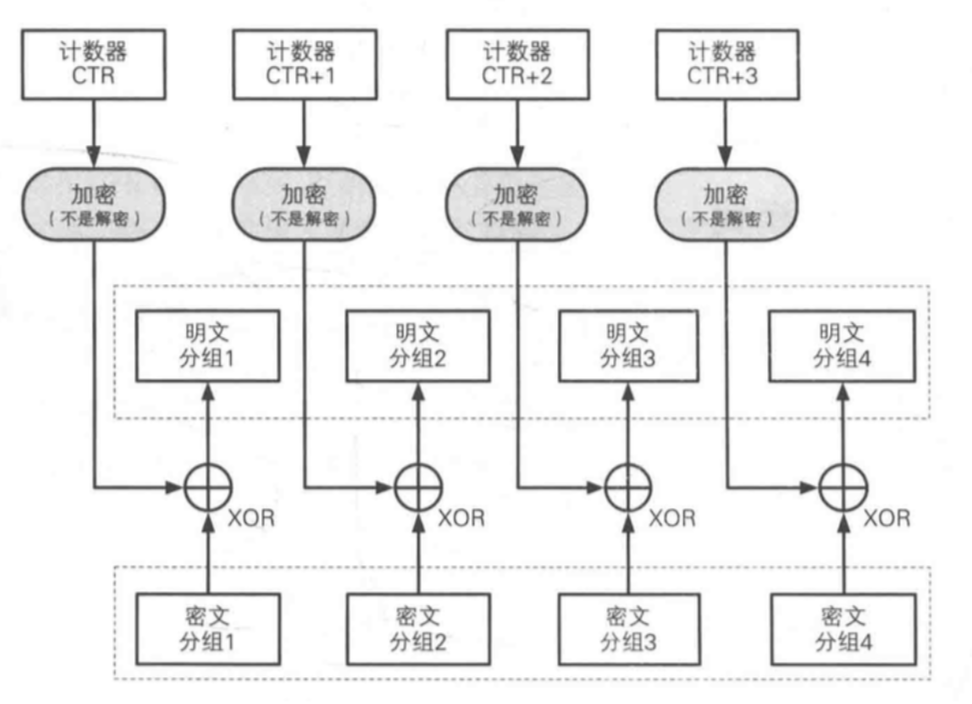
(加解密步骤一致)
特点:
- 使用了流密码
- 加解密使用了完全相同的结构,容易实现
- 可以以任意顺序解密分组 - 只要知道分组序号就好 - 所以,可以「并行解密」
代码片段
// 加密
func AesEncrypt(plaintext, key []byte) ([]byte, error) {
    // 申明初始化获取一个新的密钥块。关键参数应该是AES密钥,16,24或32个字节来选择AES-128,AES-192或AES-256。
    block, err := aes.NewCipher(key)
    if err != nil {
        return nil, err
    }

    // 切片处理申明初始化一个较大长度的新字符串变量
    ciphertext := make([]byte, aes.BlockSize+len(plaintext))
    iv := ciphertext[:aes.BlockSize]
    if _, err := io.ReadFull(rand.Reader, iv); err != nil {
        panic(err)
    }

    // 申明初始化,同时调用加密函数得到流接口
    stream := cipher.NewCTR(block, iv)
    // 流处理
    stream.XORKeyStream(ciphertext[aes.BlockSize:], plaintext)

    return ciphertext, nil
}

// 解密
func AesDecrypt(ciphertext, key []byte) ([]byte, error) {
    block, err := aes.NewCipher(key)
    if err != nil {
        return nil, err
    }
    // The IV needs to be unique, but not secure. Therefore it's common to
    // include it at the beginning of the ciphertext.

    iv := ciphertext[:aes.BlockSize]

    if len(ciphertext) < aes.BlockSize {
        panic("ciphertext too short")
    }

    plaintext2 := make([]byte, len(ciphertext))

    // 申明初始化,同时调用加密函数得到流接口
    stream := cipher.NewCTR(block, iv)
    stream.XORKeyStream(plaintext2, ciphertext[aes.BlockSize:])

    return plaintext2, nil
} |
0x3 非对称加密 & 验签
非对称加密
概述
有一对儿密钥,其中一个是公开的(公钥),另一个是保密的(私钥)
通过「公钥」不能得到「私钥」
对称加密的问题
密钥配送问题
- 传密文的时候需要一并传输密钥,会导致中间人把密钥也拿到
解决方案:
- 加/解密双方事先共享密钥,不传输
- 密钥分配中心分配密钥
- 通过Diffie-Hellman密钥交换来解决
- 通过非对称加密解决
常用非对称加密算法
- RSA
- 椭圆加密(比特币用到)
RSA算法解析
RSA - 三位开发者的首字母组成的名字
加密原理
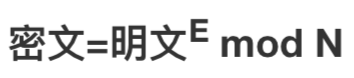
明文的E次幂,对N取余,即可得到密文。 - 「E和N的组合」就是「公钥」
解密原理
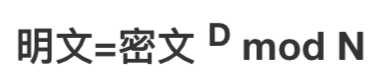
密文的D次幂,对N取余,即可得到明文 - 「D和N的组合」就是「私钥」
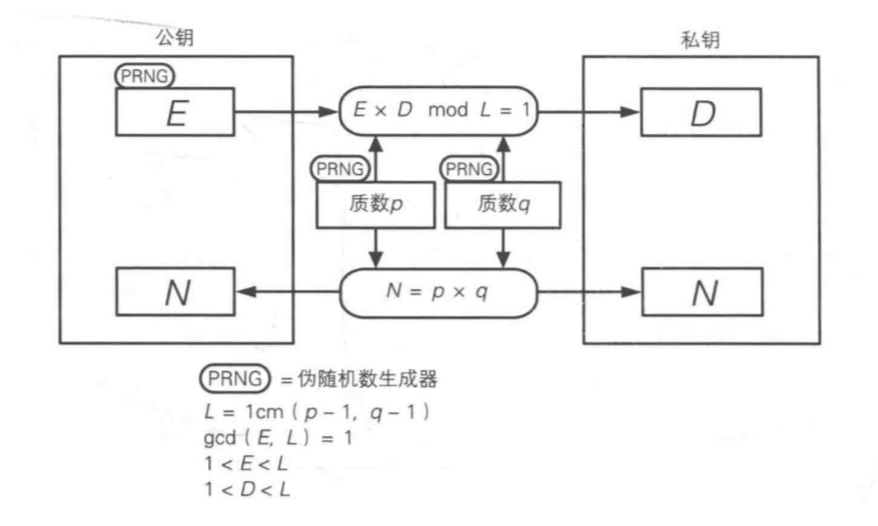
生成密钥对
我们知道,所谓的密钥对,其实就是计算生成「N、E、D」三个数字
为了生成这三个数字,我们需要引入一个临时数:L
求N
N = p x q (p与q为质数)
p与q如果过小,容易被破译
p与q如果过大,计算时间会变长
求L
L使p - 1和q - 1的最小公倍数,表示为:L = lcm(p - 1, q - 1)
求E
1 < E < L
gcd(E, L) = 1 (E和L的最大公约数为1)
满足条件的E可能有很多,随机选一个就好
求D
1 < D < L
(E x D) % L = 1
只要E确定了,D的值就是唯一的14
图示
计算密钥对 & 加解密模拟
生成公钥 & 私钥
求N:N = q * p = 17 * 19 = 323
求L:L = lcm(p - 1, p - 1) = lcm(16, 18) = 144
求E:gcd(E, L) = 1 即gcd(E, 144) = 1, 任取E = 5
求D:E * D % L = 1 即5 * D % 144 = 1, 得D = 29
由上:
- 公钥:E = 5 N = 323
- 私钥:D = 29 N = 323
加密
待加密信息为:123,公钥E=5 N=323
由 ,密文 = 255
解密
由,明文 = 123
代码片段
使用外部传入的公/私钥加解密
//  加密
func RSAEncrypt(origData []byte, pubKey []byte) []byte {
    //公钥加密
    block, _ := pem.Decode(pubKey)
    //解析公钥
    pubInterface, _ := x509.ParsePKIXPublicKey(block.Bytes)
    //加载公钥
    pub := pubInterface.(*rsa.PublicKey)
    //加密明文
    bits, _ := rsa.EncryptPKCS1v15(rand.Reader, pub, origData)
    //bits为加密的密文
    return bits
}

//  解密
func RSADecrypt(origData []byte, priKey []byte) []byte {
    block, _ := pem.Decode(priKey)
    //解析私钥
    priv, _ := x509.ParsePKCS1PrivateKey(block.Bytes)
    //解密
    bts, _ := rsa.DecryptPKCS1v15(rand.Reader, priv, origData)
    //返回明文
    return bts
} |
使用Golang生成密钥对加解密
func main() {
    //创建私钥
    priv, _ := rsa.GenerateKey(rand.Reader, 1024)
    fmt.Println("私钥为:", priv)

    //通过私钥创建公钥
    pub := priv.PublicKey

    //加密
    org := []byte("hello China")
    //通过oaep函数实现公钥加密
    //EncryptOAEP的第一参数的作用为,将不同长度的明文,通过hash散列实现相同长度的散列值,此过程就是生成密文摘要过程
    cipherTxt, _ := rsa.EncryptOAEP(md5.New(), rand.Reader, &pub, org, nil)
    //打印密文
    fmt.Println(cipherTxt)
    fmt.Println(base64.StdEncoding.EncodeToString(cipherTxt))

    //解密
    plaintext, _ := rsa.DecryptOAEP(md5.New(), rand.Reader, priv, cipherTxt, nil)
    //打印明文
    fmt.Println(plaintext)
    fmt.Println(string(plaintext))
} |
攻击:中间人
中间人拦截公钥,窃听私钥发过来的加密消息,用公钥伪造ack内容...
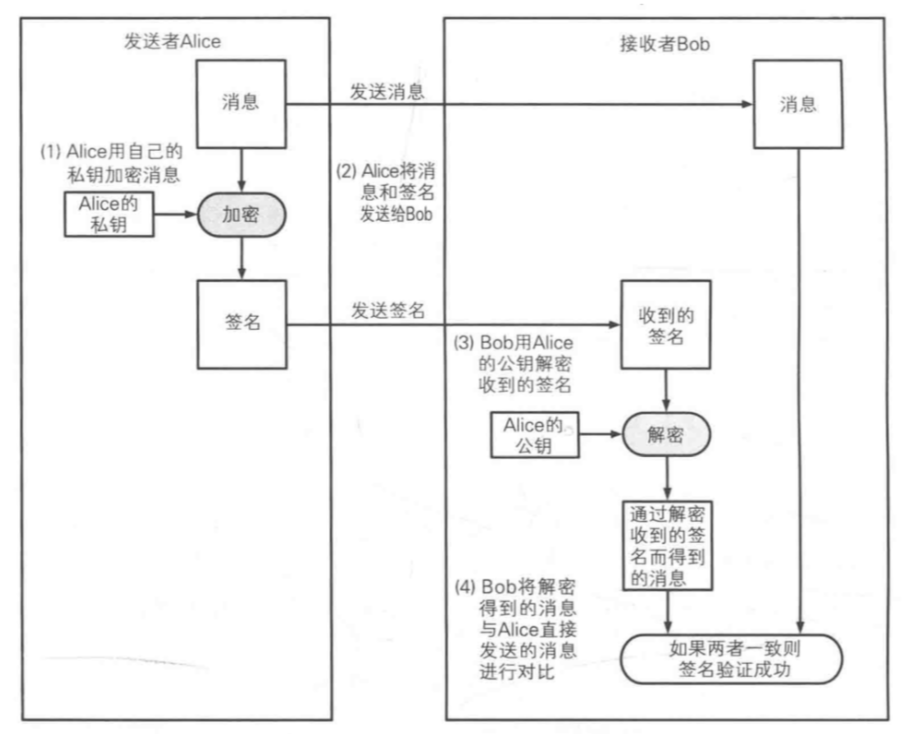
数字签名
概述
只有信息发送者才能产生的,别人无法伪造的一段数字串,可以作为发送者发送信息真实性的证明
生成签名:用私钥给消息加密生成的指纹
验证签名:用公钥解密指纹得到明文,把明文和消息做比较,如果一致,说明消息木有被篡改
签名方案
- 直接对消息签名
- 对消息的散列值签名(计算更便捷)
签名算法
- RSA
- DSA
- ECC - 利用椭圆曲线密码来实现的数字签名算法
代码片段
RSA签名 & 验签
func main() {
    //生成私钥
    priv, _ := rsa.GenerateKey(rand.Reader, 1024)
    //通过私钥生成公钥
    pub := &priv.PublicKey
    //通过hash散列对准备签名的名为做hash散列
    plaitxt := []byte("hello world")

    //实现散列过程
    h := md5.New()
    h.Write(plaitxt)
    hashed := h.Sum(nil)

    //通过pss函数,实现对明文hello world的签名
    //pss函数可以加盐,能够使得签名过程更安全
    opts := rsa.PSSOptions{rsa.PSSSaltLengthAuto, crypto.MD5}

    //实现签名
    sig, _ := rsa.SignPSS(rand.Reader, priv, crypto.MD5, hashed, &opts)

    //sig就是RSA对“hello world”签名结果
    fmt.Println(sig)

    //通过公钥实现验签
    err := rsa.VerifyPSS(pub, crypto.MD5, hashed, sig, &opts)
    if err == nil {
        fmt.Println("验签成功")
    }
} |
DSA签名 & 验签
DSA - 专业做数字签名的技术方案 - 不能用于加密和解密
func main() {
//设置私钥使用的参数
var param dsa.Parameters
dsa.GenerateParameters(¶m, rand.Reader, dsa.L1024N160)
//创建私钥
var pri dsa.PrivateKey
pri.Parameters = param
//生成私钥
dsa.GenerateKey(&pri, rand.Reader)
//创建公钥
pub := pri.PublicKey
message := []byte("hello world")
//签名
r, s, _ := dsa.Sign(rand.Reader, &pri, message)
//公钥验签
if dsa.Verify(&pub, message, r, s) {
fmt.Println("验签成功")
}
} |
ECC(椭圆加密)签名 & 验签
ECC椭圆加密
- 由DSA改进而成
- 密钥可以比RSA更短,安全性可以比RSA更高
- 比特币就是用ecc作签名的
func main() {
    message := []byte("hello world")
    //生成私钥
    //elliptic.P256()设置生成私钥为256
    privatekey, _ := ecdsa.GenerateKey(elliptic.P256(), rand.Reader)
    //创建公钥
    publickey := privatekey.PublicKey
    //hash散列明文
    digest := sha256.Sum256(message)
    //用私钥签名
    r, s, _ := ecdsa.Sign(rand.Reader, privatekey, digest[:])

    //设置私钥的参数类型
    param := privatekey.Curve.Params()
    //获取私钥的长度(字节)
    curveOrderBytes := param.P.BitLen() / 8
    //获得签名返回的字节
    rByte, sByte := r.Bytes(), s.Bytes()

    //创建数组
    signature := make([]byte, curveOrderBytes*2)
    copy(signature[:len(rByte)], rByte)
    copy(signature[len(sByte):], sByte)

    //现在signature中就存放了完整的签名的结果
    //验签
    digest = sha256.Sum256(message)
    //获得公钥的字节长度
    curveOrderBytes = publickey.Curve.Params().P.BitLen() / 8

    //创建大整数类型保存rbyte,sbyte
    r, s = new(big.Int), new(big.Int)
    r.SetBytes(signature[:curveOrderBytes])
    s.SetBytes(signature[curveOrderBytes:])

    //开始认证
    e := ecdsa.Verify(&publickey, digest[:], r, s)
    if e == true {
        fmt.Println("验签成功")
    }
} |